picture home | art | events | music | rack extensions | downloads | pixel blog

omino pixel blog

pixels, motion, and scripting
entries for category "pixel bender"
david van brink // Sun 2008.10.19 20:40 // {pixel bender}

Pixel Bender: Debug Pips

Featuring distance().

One of the important games we play while writing a script or software — or other kinds of black boxes, too — is, “How can we tell what’s going on inside?”

Modern debuggers in modern programming languages make this a nearly-solved problem. Sometimes. Maybe it’s a new language and the tools aren’t there yet, or maybe you’re too cheap to purchase them. Or maybe you just like debugging with print statements. That’s cool.

In the case of Pixel Bender, I’ve been lately using several float2 variables to represent locations on the input or output. It turns out to be quite handy to drop “print” markers right in the output, to better see what’s going on.

The trick is extremely simple. If the distance to float2 value is within a few pixels, draw a color. Here’s the code to do it. It should be done last, after other pixel computations. That way it can be easily commented out or deleted before shipping.

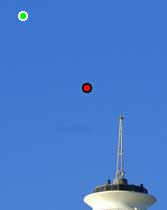
        float p1Dist = distance(p1,outCoord());
        if(p1Dist < 3.0)
            dst.rgb = float3(1,0,0); // draw red
        else if (p1Dist < 5.0)
            dst.rgb = float3(0,0,0); // black outline

Handy!

Haven't figured out how to stamp little text figures into the output yet. You'd need to decompose your desired output on a per-pixel decision tree... would be an interesting logic-reduction problem, but perhaps impractical. It would be possible and useful to stamp 3 floating point values as "special debug pixels" at (0,0) and other easy to find locations.

At any rate, here's the whole kernel, ready for copy-and-pasting.

<languageVersion : 1.0;>
kernel DebugMarkers<namespace:"ns";vendor:"omino.com";version:1;> {
    input image4 src;
    output pixel4 dst;
    parameter float2 p1<minValue:float2(0,0);maxValue:float2(400,400);>;
    parameter float2 p2<minValue:float2(0,0);maxValue:float2(400,400);>;

    void evaluatePixel() {
        float2 co = outCoord();
        dst = sampleNearest(src,co);
        float p1Dist = distance(p1,co);
        if(p1Dist < 3.0)
            dst.rgb = float3(1,0,0);
        else if (p1Dist < 5.0)
            dst.rgb = float3(0,0,0);
        float p2Dist = distance(p2,co);
        if(p2Dist < 3.0)
            dst.rgb = float3(0,1,0);
        else if(p2Dist < 5.0)
            dst.rgb = float3(1,1,1);
    }
}

oh, i dont know. what do you think?


david van brink // Thu 2008.10.16 23:07 // {pixel bender}

Pixel Bender: Fun With Cubes 1

In which I present instances of a family of closed-cell geometric objects which are computationally trivial to render.

The Concept

Imagine moving a plane through a three dimensional mesh of cubes.

You start by rotating the plane to your liking. That is, for each pixel on the plane (since that is our rendering reference point) we rotate and translate it as we like, from (x, y, 0) to (x’, y’, z’). To find out which “cell” we’re in, we just look at the integer parts of the prime-coordinates. In the animation above, the cells have been “checkered” by whether their integer coordinates’ sum is even or odd. (Actually, I just used LightWave’s 3d checker texture function. But you get the idea.)

Drawing the checkerboard is easy. Drawing some depth in the cubes is only a little bit trickier. We need a perpendicular vector from the plane, to cast a ray, so we also rotate the perpendicular vector (0,0,1) by the same amount. Then we project that ray from the fractional position within the cell until it hits one of the 6 walls of the cube. Lastly, we give a non-optical depth cue based on how far the intersected wall is.

The Implementation

Here’s the math part of the rotation. There’s probably an easier way to get the 3-axis rotation matrix… But this works.

// concatenate three simple rotations to spinM
float3x3 spinXM = float3x3(1,0,0,0,cos(spin.x),spin.x,0,-sin(spin.x),cos(spin.x));
float3x3 spinYM = float3x3(cos(spin.y),0,sin(spin.y),0,1,0,-sin(spin.y),0,cos(spin.y));
float3x3 spinZM = float3x3(cos(spin.z), sin(spin.z), 0,-sin(spin.z), cos(spin.z), 0, 0, 0, 1 );
float3x3 spinM = spinXM * spinYM * spinZM;

float2 center = float2(400,500) / 2.0; // YUCK! hardcoded for my blog entry.
float2 oc = (outCoord() - center) / zoom; // adjust "input coordinates"

// we rotate the requested coordinate by 3 axes, giving the
// R3 point on the plane of the screen (after the mesh is turnt)
float3 p = float3(oc.x,oc.y,0) * spinM; //oc.x * axis1 + oc.y * axis2;

// perp is our viewing line, straight down from the screen.
float3 perp = float3(0,0,1) * spinM;

Here is an interactive demo of the algorithm, in Flash and Pixel Bender. (I added a full screen button, whee!)

And here is the Pixel Bender kernel:

And for reference, here is the template for the Flash displayer, compilable by mxmlc.

Flex trivia: stage.addEventListener(FullScreenEvent.FULL_SCREEN,screenChange);
works from mx:Application applicationComplete because the UI and display list is all instanced, but not from mx:Application creationComplete which happens a little bit earlier.

Next up: Suppose we didn’t intersect with a simple plane… !

oh, i dont know. what do you think?


david van brink // Tue 2008.10.14 22:27 // {pixel bender}

Pixel Bender: My First Flash Program

Since I love After Effects, I need to learn Pixel Bender. To talk about Pixel Bender in this blog, it sure is handy that the new Flash Player can show it, live. But first I had to learn Flash. Darn!

So, below is a program written for Flex, compiled with Adobe’s free mxmlc command line tool. Requires Flash 10 (currently in beta). It incorporates a simple Pixel Bender kernel to draw on a rectangular area. It doesn’t use an input image.

For reference, here’s the snippet of Flex code that simply fills in an area with the Bended Pixels:

        // "draw" is the name of a UIComponent instance,
        // and "shader" is a Pixel Bender kernel instance.
        var g:Graphics = draw.graphics;
        g.clear();
        g.beginShaderFill(shader);
        var m:Number = 20;
        g.drawRect(m,m,draw.width - 2*m,draw.height - 2*m);
        g.endFill();

And, below is the swf, live, in action. Click the “animate” checkbox for most fun.

As you can see, it displays each of the kernel’s numeric parameters as a slider. Since it knows the min- and max- of each parameter, we can randomize and animate them, which is much more fun that twiddling the slider by hand, yes? It also suggests some of the possibilities when animated in After Effects CS4.

Importantly, this Flex program discerns the parameter values and ranges at run time, so you can pop in another kernel, recompile, and play some more.

Here’s the kernel code. Just a bunch of Math fun… really it was just to test out the Flash displayer, but it came out kind of psychedelic.

And here’s the Flex program. To pop in our own kernel, just alter the Embed line.

Stay tuned for some Fun With Cubes.

oh, i dont know. what do you think?


david van brink // Mon 2008.10.6 06:46 // {pixel bender}

Pixel Bender: mod() bug

The mod() Function

In GL Shading Language, and Pixel Bender, the mod function is defined like so: mod(x,y) => x - y * floor(x / y). The result is always positive. We can see quickly that y’s sign goes away. And the floor function pushes towards negative infinity so y * floor(x / y) is always “lower” (not “smaller”) than x.

The mod() Function, GPU vs CPU

Here is a short Pixel Bender kernel.

<languageVersion : 1.0;>
kernel modTest2 <namespace : "x";vendor : "omino.com";version : 1;description : "mod() bug";>
{
    // on PBT build 35, produces different display on GPU/CPU
    parameter float span;
    output pixel4 dst;

    void evaluatePixel()
    {
        float x = outCoord().x / span - 1.0;
        float y = outCoord().y / span - 1.0;
        float m = mod(x,y);
        float t = x - y * floor(x / y); // computed by definition
        dst = float4(m / y,abs(m) / y,t / y,1);
    }
    
    region generated(){return region(float4(0,0,2.*span,2.*span));}
}

On the GPU, it produces:

And on the CPU:

The blue component is correct on both CPU and GPU because it’s computed according to the formula. The other two color components reveal the nature of the bug. (Probably that x/y is being rounded towards zero.)

As an aside: Notice that some of the CPU rendering’s lines are quite a bit smoother than the GPU rendering’s. Subtly different arithmetics.

The Workaround

A workaround might not be needed, in practice. The mod() function seems to work correctly in Flash, even though it’s on the CPU. (The PBT and Flash implementations are, clearly, if surprisingly, different, since you can turn off the Flash errors & warnings in PBT. Also confirmed in this note by Adobe engineer Tinic Uro.)

On the other hand, After Effects CS4’s CPU-renderer might still have the bug. On the gripping hand, perhaps Adobe will fix it… I’ve had trouble signing up onto the JIRA system to report it, though.

But to get correct render results on the CPU within PBT build 35 on Macintosh, simply use the expanded formula.

float m = mod(x,y); // may have a bug
float m = x - y * floor(x / y); // always works.
4 comments
Kerry // Sat 2008.10.18 22:1010:10 pm

> Notice that some of the CPU rendering’s lines are quite a bit smoother than the GPU rendering’s. Subtly different arithmetics.

Yes. The GPU’s computations are using a floating-point scheme that is inferior to the CPU’s for improved performance. (It uses fewer bits and a faster but less well behaved rounding method.)

As stated by William Kahan, who architected IEEE Std 768,
“Gresham’s Law for Computing:
The Fast drives out the Slow even if the Fast is Wrong.”

david van brink // Sun 2008.10.19 13:321:32 pm

Yes!

Even more distressing is that the default arithmetic results using doubles (doubles!) under GNU-C can produce different results on Power PC and Intel. (Presumably there’s a hi-fi compiler option someplace.)

Kerry Veenstra // Sun 2008.10.19 15:563:56 pm

Hee hee! A history of floating-point computer arithmetic would fill a book. PowerPC’s floating point is pure IEEE Std 754, but none of Intel’s floating point is. (And that’s pure irony! Kahan’s work on the 8087 is what makes IEEE Std 754 so good.) The original 8087 used 10-byte numbers with 64-bit mantissas, but IEEE doubles use 8-byte numbers with 53 bit mantissas. To get results on an 8087 that are close to those of 8-byte IEEE doubles, one rounds the Intel 64-bit mantissas to 53 bits. Unfortunately, rounding first to 64 bits (as the 8087 does) and then rounding to 53 bits is not the same as rounding straight to 53 bits (as PowerPC does). So the results on PowerPC and on 8087 are slightly different. (“8087” means all x86 CPUs through the Pentium III.)

Then, with Pentium 4, Intel changed its floating-point strategy and implementation. First, Intel’s own compilers avoided the 8087-compatibility registers and instead used the processor’s SIMD media instructions for scalar computations. Since the SIMD instructions support 8-byte floating point numbers but not 10-byte 8087-like numbers, it sounds like one will get results that are the same as on the PowerPC. Unfortunately, Intel also went away from IEEE Std 754’s “gradual underflow.” Gradual underflow lets the CPU represent numbers between 2^(-1022) and 2^(-1074) without underflowing straight to zero.

As unlikely as their appearance may seem, these values will show up occasionally. And unfortunately the Pentium 4 emulates gradual underflow in software. By default such emulation is turned off–and for a good reason. Once a computation starts underflowing gradually, subsequent computations that use the gradually underflowed result also underflow. One sees a noticable hit in performance as a thread of execution drags repeatedly through the emulation library routines. In media processing, such a hit is unacceptable. So on the Pentium 4 gradual underflow emulation is disabled by default, and you get a different floating-point result than you would get on a PowerPC.

Kerry // Sun 2008.10.19 18:126:12 pm

And BTW, if the gradual-underflow issue can be dealt with, it’s likely that *floats* will give the same result on Intel and PowerPC. This is because rounding to 64 bits first and then to 23 bits (as Intel does) gives the same result as rounding to 23 bits directly (as PowerPC does). I never found the proof, but I remember that rounding to 2x (or more) bits before rounding to x bits does not change the result of the final rounding.

oh, i dont know. what do you think?


0.0253s
(c) 2003-2023 omino.com / contact poly@omino.com