picture home | art | events | music | rack extensions | downloads | pixel blog

omino pixel blog

pixels, motion, and scripting
david van brink // Fri 2023.09.8 21:26 // {after effects}

OminoLuaNote[4]: Fonts and Files

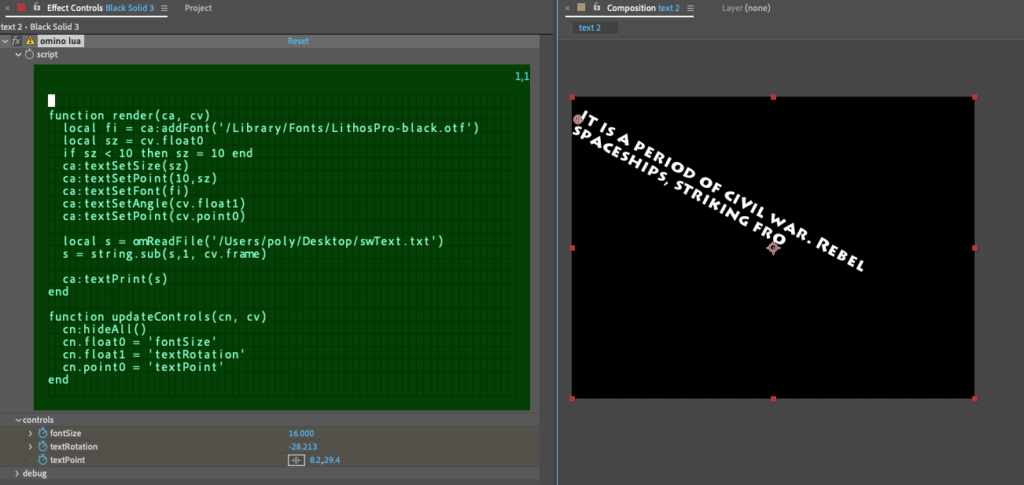
This omino lua script shows two features. First, how to load a font file with ca:addFont(path). If successful, returns an integer zero or greater which is the index to use in ca:textSetFont(). If unsuccessful, -1.

Second, it shows how to read a text file into a lua string variable. The script here prints the beginning of the string, increasing by frame number.

The rendered video below shows the parameters animated. In the case of text size, it doesn’t animate very smoothly! (The text renderer snaps to pixels for better readability.) So if you want an animated text size, better to resize the whole layer.

function render(ca, cv)
  local fi = ca:addFont('/Library/Fonts/LithosPro-black.otf')
  local sz = cv.float0
  if sz < 10 then sz = 10 end
  ca:textSetSize(sz)
  ca:textSetPoint(10,sz)
  ca:textSetFont(fi)
  ca:textSetAngle(cv.float1)
  ca:textSetPoint(cv.point0)

  local s = omReadFile('/Users/poly/Desktop/swText.txt')
  s = string.sub(s,1, cv.frame)

  ca:textPrint(s)
end

function updateControls(cn, cv)
  cn:hideAll()
  cn.float0 = 'fontSize'
  cn.float1 = 'textRotation'
  cn.point0 = 'textPoint'
end
oh, i dont know. what do you think?


david van brink // Wed 2023.09.6 12:56 // {after effects}

OminoLuaNote[3]: Builtin Values

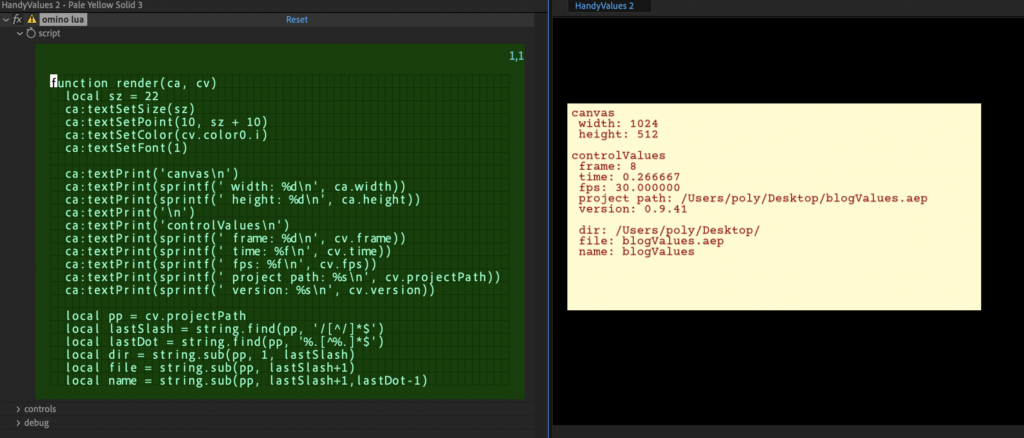
omino lua provides several useful builtin values. They are in the two arguments of the render() function. The first argument, the canvas, is responsible for drawing text and graphics, and has graphical information. The second argument, the control values, has the visible sliders and checkboxes and such, plus a few extras.

function render(ca, cv)
  local sz = 22
  ca:textSetSize(sz)
  ca:textSetPoint(10, sz + 10)
  ca:textSetColor(cv.color0.i)
  ca:textSetFont(1)

  ca:textPrint('canvas\n')
  ca:textPrint(sprintf(' width: %d\n', ca.width))
  ca:textPrint(sprintf(' height: %d\n', ca.height))
  ca:textPrint('\n')
  ca:textPrint('controlValues\n')
  ca:textPrint(sprintf(' frame: %d\n', cv.frame))
  ca:textPrint(sprintf(' time: %f\n', cv.time))
  ca:textPrint(sprintf(' fps: %f\n', cv.fps))
  ca:textPrint(sprintf(' project path: %s\n', cv.projectPath))
  ca:textPrint(sprintf(' version: %s\n', cv.version))

  local pp = cv.projectPath
  local lastSlash = string.find(pp, '/[^/]*$')
  local lastDot = string.find(pp, '%.[^%.]*$')
  local dir = string.sub(pp, 1, lastSlash)
  local file = string.sub(pp, lastSlash+1)
  local name = string.sub(pp, lastSlash+1,lastDot-1)

  ca:textPrint('\n')
  ca:textPrint(sprintf(' dir: %s\n', dir))
  ca:textPrint(sprintf(' file: %s\n', file))
  ca:textPrint(sprintf(' name: %s\n', name))
end

Here we see that ca.width and ca.height have the dimensions of the solid layer that has the effect. Cooridnates in omino lua are always at natural resolution, even when rendering is downsampled by half or more.

And cv, the control values, has the current frame and time within the layer (not the comp), and the frame rate.

We can also see the project path here. That’s maybe nice for watermarking your renders or something. But it will also be useful for data-driven projects where you provide a data file, and want to keep it next to your After Effects project file. Oh yes, omino lua can read files!

Lastly, we see an example of Lua’s regular expressions, lastDot = string.find(pp, ‘%.[^%.]*$’). This looks for a dot, followed by not-dots until the end of the line. Lua’s REs differ from many by using the percent-sign as the literal escape, and indexes start from 1, and ranges are inclusive.

oh, i dont know. what do you think?


david van brink // Thu 2023.08.31 20:20 // {after effects}

Omino Lua After Effects Plugin

This plugin is available for prerelease use and feedback. (I hate to say “testing” but that too.) It’s solid enough. More info and download HERE.

oh, i dont know. what do you think?


david van brink // Sun 2014.04.13 15:24 // {after effects}

Omino Plugins 2.1 for After Effects

(After some back and forth regarding broken DLLs on our release two weeks back…)

OminoSuite21

By popular demand, the Omino Suite including Kaleidoscope and Snake is now available for both Mac OS X and Windows.

Notes for release 2.1 are:

  • Available for Windows and Mac OS X
  • Works on AE CS6 and Later
  • Installed manually by dragging
  • Kaleidoscope speedup with multithreads
  • Snake rendering errors with tiny holes substantially reduced
  • Minor parameter name changes (old projects still work fine)

Get it at the first link on the download page.

How To Install

In the zip file are two folders, one for Mac OS X, and one for Windows. Drag the appropriate folder as shown below.

OminoSuiteMacInstall1

OminoSuiteWinInstall1

Any problems (or feature requests, of course) please comment or email me, poly@omino.com. Enjoy!

6 comments
sandra // Thu 2014.05.29 07:087:08 am

Hi, I hope you can answer me as quick as possible, because I am having a problem with your Omino Snake plugin in combination with After Effects CC. When I am following the tutorial on vimeo about the layer and path thing, it’s not connecting to the image I am using. I also tried to put the image in a new composition, but that doesnt help. I hope you can help me out because I really like the plugin!

david van brink // Thu 2014.05.29 13:121:12 pm

Hello —
The most likely two things are:
1) there’s a Bug where the snake image size start as 1%, so too small to see, set slider up to 100%.
2) the vertical-offset needs to be set to around 1/2 the height of your snake image.

That might be the issue, best.

sandra // Thu 2014.05.29 22:5610:56 pm

thanks for your quick help. I am a bit further now, it is showing two circles now instead of nothing. here is a screenshot of what i see now http://oi57.tinypic.com/2psocnk.jpg. I am not able to see my puppet anymore when i click the path-layer off. I am still doing something wrong but i am following this tutorial

step by step…

sandra // Thu 2014.05.29 23:0511:05 pm

Sorry for al these reply-bombing. I am further by setting the scale to 80%, but it is using my image the wrong way. the left puppet is how i want it to show on the path (like your snake) but it is turning it into the one you see on the path.. what am i doing wrong? http://oi58.tinypic.com/dbo9iv.jpg

david van brink // Thu 2014.05.29 23:2611:26 pm

Ah, yes, the “snake” image has to be horizontal, long in X and narrow in Y.

sandra // Thu 2014.05.29 23:4111:41 pm

Wow thanks for your quick reply! that worked! now another problem (hope its the last one!) when i want to set the keyframe for it to move, it is only visible in the first frame, changes color in the second en then disapears.. so i cannot set the ‘advance’ to when i want it to ‘snake’

oh, i dont know. what do you think?


Deprecated: Function the_block_template_skip_link is deprecated since version 6.4.0! Use wp_enqueue_block_template_skip_link() instead. in /home/polyomino/omino.com/pixelblog/wp-includes/functions.php on line 6114

0.0317s
(c) 2003-2023 omino.com / contact poly@omino.com